This tutorial assumes you know how to connect to your Office 365's Exchange Online Tenant with PowerShell. If you're unsure of how to do this please follow the steps here to get setup.
To delegate full access to a mailbox without automapping in Outlook:
Add-MailboxPermission -Identity <MailboxID> -User <User> -AccessRights FullAccess -AutoMapping:$false
Where:
<MailboxID> - The mailbox to which you want to provide access.
<User> - The user who needs access to the mailbox.
Automapping - $true or $false depending on whether you want the mailbox to appear in users local Outlook profile. $true will show the mailbox, $false will hide the mailbox.
The delegate can now access the mailbox via the below URL:
https://outlook.office.com/owa/[email protected]
Where:
[email protected] - Is the email address
- Schema Master
- Domain naming master
- RID master
- PDC emulator
- Infrastructure master
Schema Master
The Schema Master is the only server in the domain that's allowed to change the structure (otherwise known as the schema) of the Active Directory database.
Domain Naming Master
The Domain Naming Master is the only server in the Forest which can add or remove domains from the Active Directory database.
RID Master
The RID Master is the only server in the domain which hands out Relative ID's (RIDs). A Relative ID is a unique identifier generated for each security principal (typically a user or group). When it's combined with the domain's unique identifier it creates an ID that is unique across domains.
RID = Security Principal Unique Identifier (typically a user or group)
domain SID = Domain's Unique Identifier
SID = domain SID + RID
PDC Emulator
The Primary Domain Controller (PDC) Emulator handles Time Synchronization and legacy Primary Domain controller functions for backwards compatibility with Windows NT 4.0 and earlier domains.
Infrastructure FSMO Role
The Infrastructure FSMO Role handles references of objects in other domains.
Note: Under certain circumstances you should assign this role to a domain controller that is NOT running as a Global Catalogue server. Please see the microsoft reference below for more details.
References:
https://support.microsoft.com/en-au/help/197132/active-directory-fsmo-roles-in-windows
]]>The Exchange Online PowerShell module is the easiest way to connect to your instance. It has built-in support for MFA so you don't need to generate an app password to interact and prevents non MFA credentials from leaking. To get working with the Exchange Online PowerShell module follow the steps below:
Install the Exchange Online PowerShell Module:
- Open https://admin.microsoft.com
- Click 'Admin Centers'
- Click 'Exchange' on the left
- Click 'hybrid' on the left
- Click 'configure' under '…Exchange Online PowerShell Module supports…'
- Install the module
Connect to your instance:
- Open the 'Exchange Online PowerShell Module'
- Run the following command to connect:
Connect-EXOPSSession -UserPrincipalName <365 Username>
3. Login to the prompt
4. Check if you can successfully query your instance by listing any available mailbox's:
Get-Mailbox]]>
This guide will run through a two step process on configuring the routers DNS fowarder and pulling a fresh date/time value from the listed time server (NTP). The below commands should work with most Vyatta variants such as VyOS, EdgeOS (Ubiquiti EdgeRouters).
Configure DNS Servers:
user@router# set service dns forwarding name-server 8.8.8.8
user@router# set service dns forwarding name-server 8.8.4.4
user@router# commit ; save
Configure Time Servers:
user@router# set system ntp server pool.ntp.org
user@router# commit
user@router# delete system ntp server pool.ntp.org
user@router# commit ; save

user@router~$ show date
Working on a router remotely can be anxiety inducing. Where possible you'll probably want to avoid a late night trip to the datacenter or remote site due to a split second lapse in judgement. Most CLI based routers will let you set a time period to work within after which, if not confirmed, the configuration will roll back. For routers without this functionality built-in you can schedule a reboot in the future and commit the configuration as you work without saving. If something goes wrong and you loose connectivity, when the scheduled reboot runs, the system will revert to the last saved configuration. If your changes were problem free simply save the configuration before the scheduled reboot.
EdgeRouter Configuration Rollback:
vyos@vyos# commit-confirm n
'n' is the number of minutes in the future.
Once you're finished applying changes run confirm.
Below are the direct download links for Windows Server 2019. Theses were initially pulled by Microsoft due to issues with the ISO's. These images should only be used in evaluation scenarios where you want to get a head start learning about the new features in Windows Server 2019. Do not use these images for production or situations in which system failure / corruption would be a concern.
Server 2019 Hyper-V
Server 2019 Datacenter (VHD)
Server 2019 Standard
Server 2019 Essentials
VyOS is a versatile open source router forked from Brocade's previously open source Vyatta project. Here I'll outline a basic install which will function as a single NAT router. This configuration is great for virtual lab environments.
Pre-requisites: This assumes you've already created a blank VM and mounted the VyOS image.
Default Login:
Username: VyOS
Password: VyOS
Install VyOS image to local disk:
vyos@vyos~$ install image
Follow the prompts...
Enter 'Configuration' mode
vyos@vyos~$ configure
This changes the environment so you can make changes to the settings.
Set the WAN to listen for DHCP
vyos@vyos# set interface ethernet eth0 address dhcp
Note: Depending on the environment you may want to consider a static IP or bridging this with a PPPoE interface.
Set a Static IP on the internal interface
vyos@vyos# set interface ethernet eth1 address '192.168.0.1/24'
Note: This will set the ip address of the internal interface used by clients as the default gateway.
Add a description to the interfaces
vyos@vyos# set interface ethernet eth0 description 'WAN Interface'
vyos@vyos# set interface ethernet eth1 description 'LAN Interface'
Configure NAT on WAN
vyos@vyos# set nat source rule 100 outbound-interface 'eth0'
vyos@vyos# set nat source rule 100 source address '192.168.0.0/24'
vyos@vyos# set nat source rule 100 translation address masquerade
Line 1: This creates a NAT rule (number 100) and sets the external interface for the rule to 'eth0'
Line 2: This identifies the clients for which the router will process NAT so they can communicate via the WAN using the same external/public IP.
Line 3: This enables masquerading for the NAT rule so all clients appear to be communicating from the one WAN IP.
Configure Stateful Firewall from WAN to internal network
vyos@vyos# set firewall name OUTSIDE-IN default-action 'drop'
vyos@vyos# set firewall name OUTSIDE-IN rule 10 action 'allow'
vyos@vyos# set firewall name OUTSIDE-IN rule 10 state established 'enable'
vyos@vyos# set firewall name OUTSIDE-IN rule 10 state related 'enable'
Line 1: Creates a firewall policy named 'OUTSIDE-IN' and sets it to drop traffic by default.
Line 2: Creates a firewall rule (number 10) which allows traffic that matches the rule.
Line 3: Specifies that the rule is applicable when there is an established session for the traffic.
Line 4: Specifies that the rule is applicable when there <confirmbeforeposting>
Configure firewall to drop traffic sent directly to router
vyos@vyos# set firewall name OUTSIDE-LOCAL default-action 'drop'
Note: Drop all traffic by default
Link firewall rules, interfaces and direction
vyos@vyos# set interfaces ethernet eth0 firewall in name 'OUTSIDE-IN']]>
vyos@vyos# set interfaces ethernet eth1 firewall local name 'OUTSIDE-LOCAL'
Line 1: Link the 'OUTSIDE-IN' firewall policy to the eth0 interface for traffic directed inbound to other devices.
Line 2: Link the 'OUTSIDE-LOCAL' firewall policy to the eth0 interface for traffic directed inbound to the router itself.
Virtual Router Redundancy Protocol or VRRP for short allows multiple routers to coordinate the use of a shared IP address known as a Virtual IP in case of failover. It works on a master/backup model in which one router is designated the primary and the others are allocated as backups.
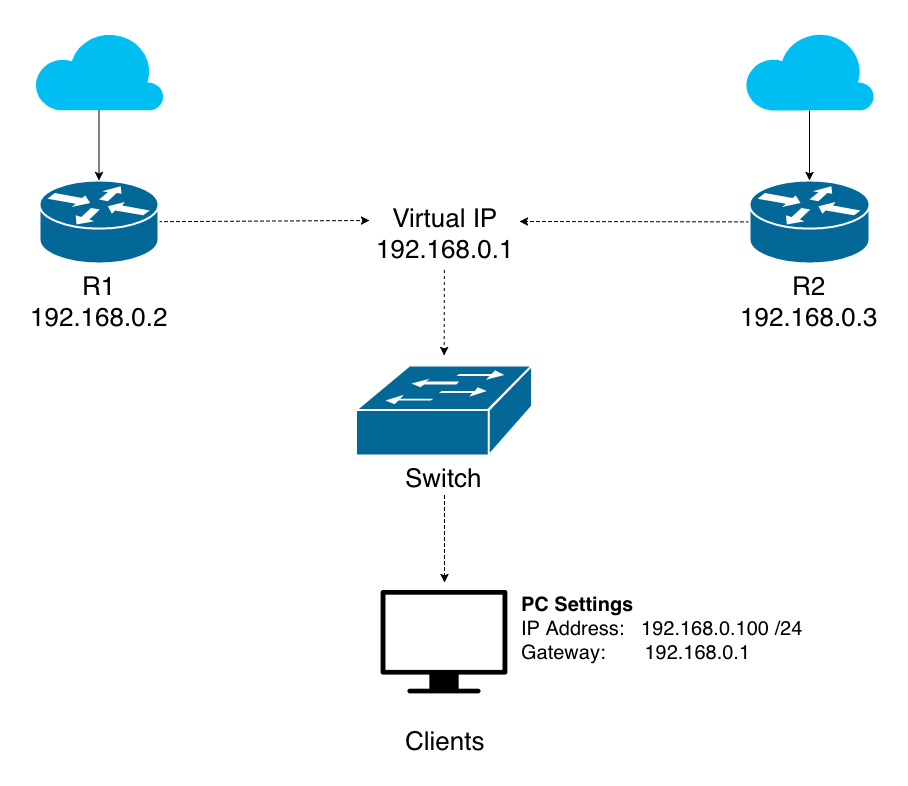
The primary router takes control of the VIP (Virtual IP) and communicates on its behalf. If it fails the next highest priority router within the group will be promoted in its place.
The primary will periodically send a heartbeat to all backup routers letting them know it is online. If the backup routers do not receive the heartbeat within the allocated period (three times the advertisement timer) the election process is initiated.
Things to watch out for...
VRRP is not a silver bullet when it comes to a highly available router. I like to think of it as a key component in the bigger picture of high availability. With that in mind, you may need to consider the following in cases where services are hosted publicly or there are multiple routed subnets.
1. Inbound Routing
You may have noticed that in the example topology VRRP doesn’t provide the same redundancy to external clients as internal clients because there is no Virtual IP on the WAN. In certain circumstances it’s possible to setup VRRP on the WAN, however, it requires a minimum of 3 public IP addresses in the same network and might require your ISP to support gratuitous arp depending on your hardware. A much better solution to the problem is to use a dynamic routing protocol such as BGP to re-route traffic to a live router. BFD can be used to shorten the associated convergence time.
2. Outbound Routing and Link Failure
VRRP does not protect against WAN link failure. The primary router will continue to send its heartbeat regardless of whether it has an available default route. This means if your primary router’s WAN link fails you won’t be able to reach the internet although your backup router(s) have functional WAN links available. To protect against this a dynamic routing protocol such as OSPF can be used to automatically route outbound traffic based on network availability. For example, if a client requests a website and there are no available wan link on R1, OSPF can be used to advertise a default route via R2. In this way R1 continues to act as the primary VRRP router and is provided enough information to successfully connect clients to the internet.
3. Network Services
If you’re hosting network services such as DHCP, DNS or a VPN on your router, you may want to replicate these settings to all backup routers and where applicable, account for duplication of settings. For example, you may want to split your DHCP scope so new clients can obtain an IP address if the primary router fails. Additionally, you may want to configure multiple VPN links to each destination so a route is available if the primary link(s) fail.
Alternatives
As an alternative to VRRP, Cisco has a proprietary protocol called Hot Standby Router Protocol (HSRP). Unless you’re working in environments with Cisco only gear you’ll likely use VRRP due to wider device compatibility. Cisco devices generally support VRRP in addition to their proprietary HSRP.
Learn More
IETF RFC: https://tools.ietf.org/html/rfc3768
Wikipedia: https://en.wikipedia.org/wiki/Virtual_Router_Redundancy_Protocol